How to press plants like a botanist
By Nancy Nickolson, Family Programs Coordinator, and Donna Cherniawsky, Assistant Curator of Botany
August 17, 2020
A green world is all around us! Botanists study this world by collecting and documenting plant species to learn about things like plant variation, the fascinating relationships between plants, and even fluctuations in plant distribution due to environmental changes.
Plant pressing is the most common way for museums to preserve plants. The goal of pressing a plant is to extract the moisture in the plant as fast as possible, all while preserving the form and structure of the specimen. Read on to discover more about the botany collections at RAM, and how to start pressing your own plants!
In the Collection
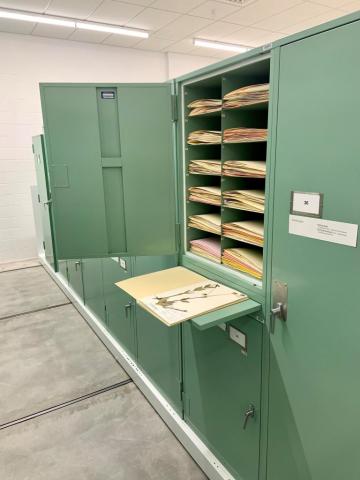
Our plant collection is stored in a special, climate-controlled room called a herbarium. The herbarium contains more than 165,000 specimens including vascular plants, bryophytes and lichens!
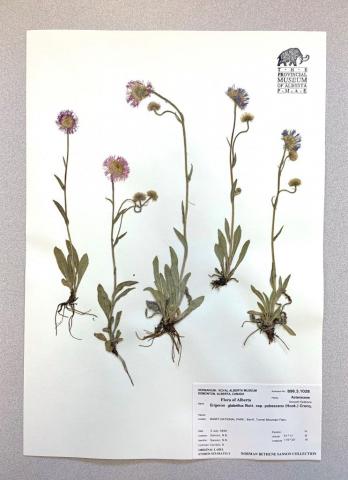
This pressed plant is part of the Museum’s heritage collection. It was collected by Norman Sanson in the summer of 1899 in Banff National Park. This plant is called Erigeron glabellus var. pubescens, also known as “Smooth Fleabane”.
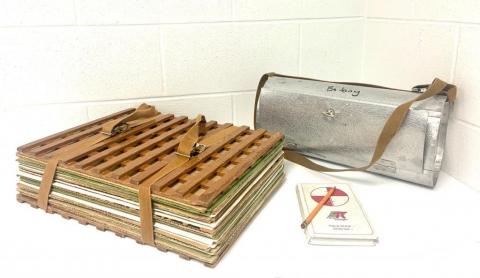
In the past, botanists used a metal cylindrical container called a vasculum to collect and transport plants (right). Nowadays, RAM staff use a portable field press to keep the plants safe while collecting specimens. Once they arrive onside, plants are transferred to a permanent press (left) Botanists also carry a notebook while out in the field to keep track of information useful for future scientific research (center).
How to: Press plants like a botanist!
Difficulty: Easy
Time: Varies, depending on the size and type of plants being pressed
What you’ll need:
- notebook
- pencil
- container to collect your plants
- freshly collected plants
- corrugated cardboard
- several sheets of newspaper/uncoated flyers or blank newsprint paper
- something flat and heavy (books work well)
- heavy duty white paper or cardstock
- white glue
- wax paper
1. Collect your Plants
Always respect nature and others while collecting. Like animals, some species of plants are rare and require protection. Avoid collecting in parks or on private property (unless you have permission).
| Plants that press well | Plants to avoid pressing |
|---|---|
| Healthy plants, with no insect damage | Aquatic plants (they’re too wet) |
| Fresh Flowers that look like they just opened and are not wilted | Conifers (some lose their needles during pressing) |
| Flat flowers and leaves so they will look life-like when flattened from the press | Flowers with white petals (May absorb ink from printed newsprint. Use unprinted paper instead) |
| Flowers with blue petals (they often lose their colour) | |
| Bulky or fleshy plants or ones with fruits |
2. Assemble your Plant Press
Plant: When laying out your plant, consider how you want the plant to look after it is dried. When RAM staff do this, they try to make sure the plant will imitate how it looks in nature and that different parts of the plant are as visible as possible.
Newspaper: Use several pieces on each side of the plant. The newspaper is absorbent, so it is going to do most of the work soaking up the water inside the plant. Avoid using flyers with a shiny coating; these won’t work well and might actually trap the moisture inside, causing mould.
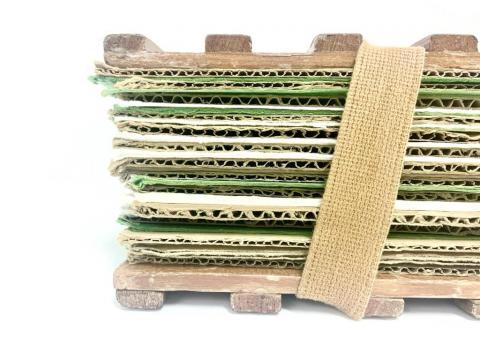
Cardboard: The open tubes of the cardboard assist with air flow, ensuring that the plant dries quickly. Cut all your cardboard pieces to the same size, and make sure that your plant is not bigger than the cardboard. Make sure to cut several cardboard pieces (and have extra on hand too). Our cardboard in the video is 8 x 12 inches.
Books (or something heavy): On the top of your press, place your weights. Ideally, the weight should be distributed evenly, so try to choose a weight that is flat and of similar size to the press.
Useful Tip: To speed up the drying process and to reduce colour fading, you can also set up a fan to blow directly across the press.
3. Wait…(patiently)
You should check your plant often (we recommend daily for the first few days), replacing the newspaper as it gets wet. If the surrounding cardboard gets wet too during the pressing process, replace them too. You will know when your plant has dried because it will no longer stick to the newspaper.
4. Mount your Plant
Now that your specimen has been pressed, you’ll want to mount it to a supporting surface.
Get some heavy-duty white paper or cardstock (acid-free is best) and dab a few dots of clear liquid glue (neutral pH is best) onto the back of the plant. Place a sheet of wax paper over it then a sheet of cardboard. Any excess glue will stick to the wax paper and not the cardboard above it. Layer them like you did with the plant press. Place some weight on top and let dry for one day.
Useful tip: Acid free materials and pH neutral glue can be found at specialty art stores.
5. Label your Plant
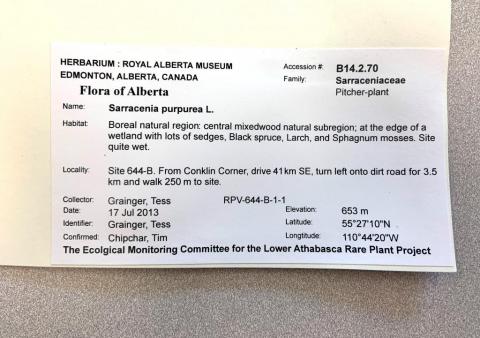
Just like we do at RAM, remember to label your plant for future reference, using information from your notebook. Include what it is (if you know), the date collected, where it was collected, and what kind of area it was growing in (example: growing in grasses, growing beneath trees, etc.)
Here's an example of a label from the museum’s collection. The museum captures a lot of information for future reference and research.
6. Display or Store your Pressed Plant
Choose where your specimen will be stored. For example, this might be in a display frame or in a nature journal. When displaying framed plants, avoid placing it in areas with direct sunlight. Light will cause rapid fading and deterioration. Mat board or spacers should also be used to ensure the glass of the frame is not touching the plant.
7. Enjoy and Share!
If you press a plant, we’d love to see it! Be sure to tag us on Facebook, Instagram, or Twitter